Category: Uncategorized

  • Automating GlobalProtect Certificate Renewal on a Palo Alto Firewall

    Disclaimer: This text is highly AI generated

    Keeping SSL/TLS certificates updated for a GlobalProtect portal is one of those tasks that sounds simple until you account for validation, firewall policy, certificate import, profile updates, and commits. This project automates that entire workflow with a single Python script.

    Get it here: https://github.com/skadevare/PaloAlto-Letsencrypt-Certificate-Auto-Updater

    Details

    The script is designed for Palo Alto firewalls and handles both automated Let’s Encrypt renewal and manual certificate import. Its main purpose is to keep a GlobalProtect SSL/TLS Service Profile updated with the correct certificate without requiring repeated manual work every few months.
    What Problem This Solves

    A GlobalProtect portal needs a valid public certificate. If that certificate expires, users will see certificate warnings or lose trust in the portal entirely. Renewing the certificate manually every time is tedious and error-prone.
    This script automates the full lifecycle:

    • opening HTTP access temporarily for ACME validation
    • running Certbot
    • closing the temporary firewall access
    • importing the new certificate into PAN-OS
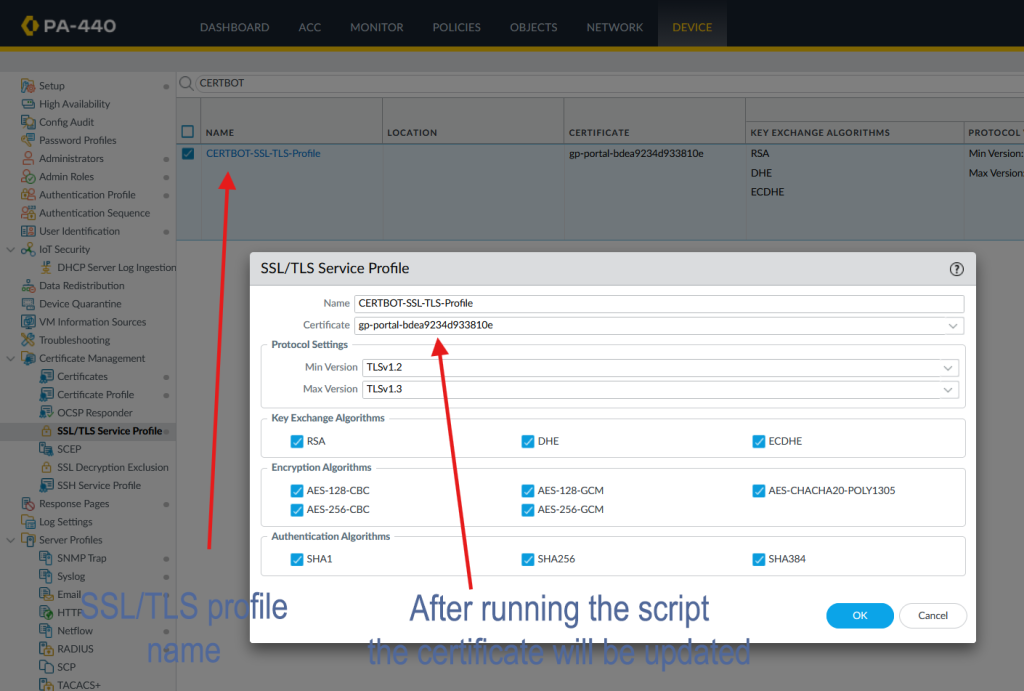
    • updating the SSL/TLS Service Profile
    • committing the configuration
      It also supports a manual mode for cases where you already have a certificate and private key and only want to push them to the firewall.

    How the Automated Mode Works

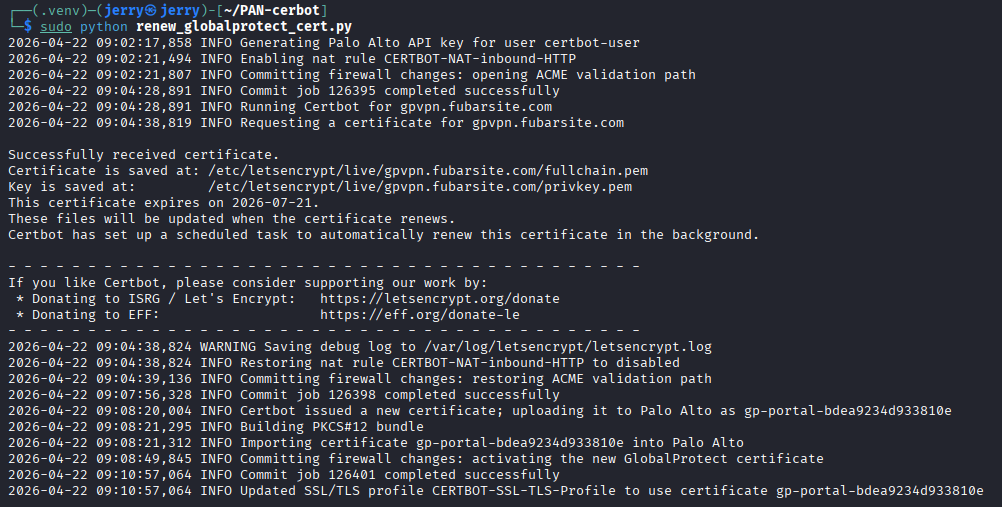
    In normal mode, the script performs the following steps:

    1. It connects to the Palo Alto firewall API.
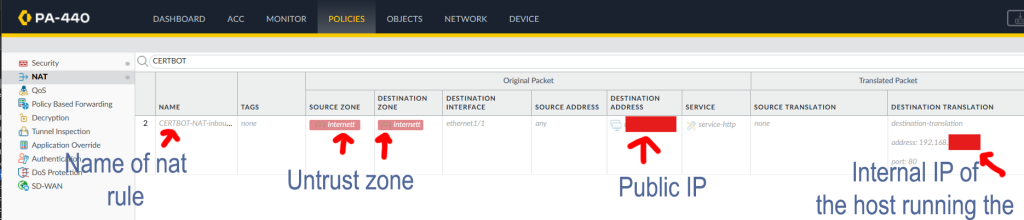
    2. It checks the current state of a predefined NAT rule and an optional predefined security rule.
    3. If those rules are disabled, it enables them.
    4. It commits the firewall configuration so inbound TCP port 80 is reachable.
    5. It runs Certbot in standalone mode.
    6. Certbot temporarily hosts the HTTP-01 validation response on the local machine.
    7. After validation, the script restores the original rule state and commits again.
    8. It builds a temporary PKCS#12 bundle from the certificate and private key.
    9. It uploads that bundle to the firewall.
    10. It updates the configured SSL/TLS Service Profile to use the matching certificate object.
    11. It commits the change.
      This gives you a repeatable certificate renewal process with minimal manual intervention.

    Why It Uses Existing Firewall Rules

    The script does not try to create NAT or security rules from scratch. Instead, it toggles rules that already exist on the firewall.
    That is intentional.
    NAT and security rules depend on details that are different in every environment, such as:

    • interface names
    • zones
    • public IP addresses
    • translated addresses
    • existing policy structure
      Because of that, the safer design is to create the required rules once in PAN-OS, keep them disabled, and let the script enable and disable them only when needed.
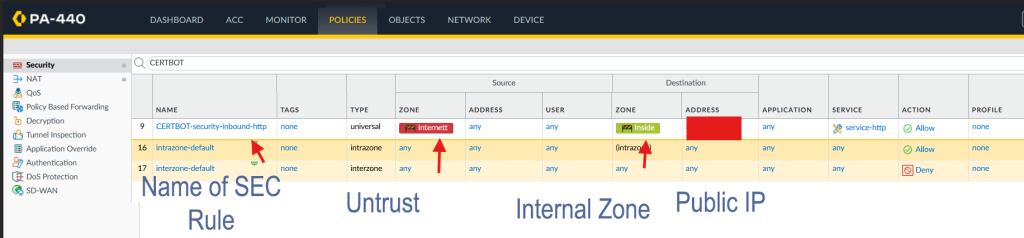
      Security Rule Handling
      If a security rule is configured, the script handles it just like the NAT rule.
      That means:
    • if the security rule is disabled, it gets enabled before Certbot validation
    • after validation, it is disabled again
    • if it was already enabled, the script leaves it enabled
      This makes the workflow cleaner and avoids leaving temporary access open longer than necessary.

    Manual Certificate Import Mode

    • The script also supports a manual import mode.
      This is useful when:
    • you already received a certificate from another source
    • you want to test certificate import without running Certbot
    • you want to update the GlobalProtect profile directly from a certificate and key file
      Example command:
      python3 renew_globalprotect_cert.py –manual-cert –incert /path/to/fullchain.pem –inkey /path/to/privkey.pem
      In manual mode, the script:
    • skips Certbot entirely
    • does not touch NAT or security rules
    • builds the PKCS#12 file
    • uploads it to the firewall
    • updates the SSL/TLS profile
    • commits the change

    How Certificate Naming Works

    The script derives the PAN-OS certificate object name from the certificate fingerprint.
    That gives two benefits:

    the same local certificate can be reused cleanly

    the script can avoid creating unnecessary duplicate certificate objects
    If the firewall already has the matching certificate object and the SSL/TLS profile already points to it, the script skips the update.

    Scheduling

    Manual mode works best with real certificate files or proper Let’s Encrypt paths.

    The intended use case is periodic execution through systemd, for example every three months.
    A quarterly timer matches the original renewal idea, but in practice monthly execution is safer for 90-day Let’s Encrypt certificates. Certbot usually does nothing until a renewal is actually needed, so running more often reduces the risk of missing the renewal window.
    Important Operational Notes
    A few things matter in production:

    The script performs full PAN-OS commits.

    If unrelated candidate changes already exist on the firewall, those should be considered before running it.

    Final Thoughts

    This script turns certificate renewal for a Palo Alto GlobalProtect portal into a predictable workflow instead of a manual maintenance task. It reduces the chance of expired certificates, keeps the firewall changes temporary, and makes it easier to manage both automatic and manual certificate updates from one place.
    If you manage GlobalProtect in an environment where certificate rotation has been a recurring headache, this kind of automation can remove a lot of unnecessary operational friction

  • Lipo battery cheat sheet

    Ever since transitioning from traditional drones from DJI over to FPV and now self buildt fpv drones using LiPos Ive been a bit scared of how you are supposed to treat these batteries. Im used to the traditional percent indication of battery charging and usage. LiPos is something much more complex and requires a bit of learning to be comfortable using, charging and storing. Here`s a little cheatsheet that I use to remember all of this and different recommendations.

    For a 6S LiPo battery used in an FPV drone, the recommended voltage values are:

    • Max Charging Voltage (Fully Charged):
      • 4.2V per cell25.2V total (Standard LiPo)
      • 4.35V per cell26.1V total (If using HV LiPo – High Voltage LiPo)
    • Minimum Recommended Voltage for Landing:
      • 3.5V–3.6V per cell21.0V–21.6V total (Safe landing voltage)
      • 3.3V per cell19.8V total (Absolute minimum, but avoid reaching this often to prevent battery damage)
    • Storage Voltage (For Long-Term Battery Health):
      • 3.8V per cell22.8V total (Ideal storage voltage)

    1. Internal Resistance (IR)

    • What it is: Measures battery health and efficiency; lower resistance means better performance.
    • Ideal Values:
      • 1–5 mΩ per cell for a high-quality, new battery.
      • Above 10 mΩ per cell indicates aging or potential degradation.
    • Tips:
      • Higher IR leads to voltage sag and lower power output.
      • Regularly check IR using a charger or battery tester.
      • Avoid using batteries with significantly high IR, as they may overheat under load.

    2. Temperature Management

    • Ideal Operating Temperature:
      • During Use: 20°C to 45°C (68°F to 113°F)
      • During Charging: 15°C to 35°C (59°F to 95°F)
      • Avoid:
        • Over 60°C (140°F) as this can damage cells permanently.
        • Flying in cold temperatures (<10°C / 50°F) can cause voltage sag. Warm up batteries before flight in cold weather.
    • Cooling Down:
      • After flying, let the battery cool to room temperature before charging.
      • Never charge a hot battery immediately after use.

    3. Storage Recommendations

    • Voltage: 3.8V per cell (22.8V for 6S)
    • Temperature: 15°C to 25°C (59°F to 77°F)
    • Humidity: Low humidity (<50%) to prevent corrosion.
    • Storage Duration:
      • Short-term: Can store for a few days fully charged but not recommended.
      • Long-term (weeks/months): Always store at 3.8V per cell.
    • Safe Storage Practices:
      • Store in a LiPo-safe bag or fireproof container.
      • Keep away from flammable materials.
      • Periodically check voltage if stored for months.

    4. Placement and Mounting in FPV Drones

    • Secure Mounting: Use a strong Velcro strap and battery pad (like Ummagrip) to prevent shifting during flight.
    • Center of Gravity: Place the battery as close to the center as possible to maintain balance.
    • Orientation:
      • Most FPV drones mount batteries on top for better maneuverability.
      • Some long-range setups use bottom-mounted batteries for stability.
    • Protection:
      • Consider foam padding to absorb impact.
      • Avoid crushing or bending the pack.

    5. Charging Safety

    • Use a Balance Charger to ensure all cells are charged evenly.
    • Charge in a Safe Area: Avoid charging near flammable objects.
    • Never Leave Unattended while charging.
    • Use the Right Amperage:
      • 1C charging (e.g., 1300mAh battery → charge at 1.3A) is the safest.
      • 2C+ charging is possible for some high-quality LiPos, but it may reduce lifespan.

    LiPo Connectors & Chargers for FPV Drones

    Proper connectors and charging equipment are essential for safety and performance. Here’s what you need to know:


    1. Battery Connectors

    Different LiPo connectors affect power delivery, resistance, and compatibility with your FPV drone setup.

    Common Connector Types for FPV Drones:

    1. XT60 (Most Common for 4S & 6S LiPo)
      • Rated for 60A continuous, 180A peak
      • Standard on most FPV drones (5-inch & up)
      • Reliable and widely used
    2. XT90 (For High-Power Setups)
      • Rated for 90A continuous, 240A peak
      • Used for larger quads (7-inch+, X-Class, cine-lifters)
      • Includes an anti-spark version to prevent arcing when plugging in
    3. XT30 (For Small Drones & Whoops)
      • Rated for 30A continuous
      • Used on 2S–4S small drones (Toothpicks, Tiny Trainers)
    4. EC5 / AS150 / QS8 (For Heavy-Lift Drones)
      • Used in X-Class drones, large cine-lifters, & long-range quads
      • QS8 has an anti-spark feature to prevent connector damage
    5. JST / PH2.0 / BT2.0 (For Micro Drones)
      • JST (Red) → Used in some 2S drones (~5A rated)
      • PH2.0 / BT2.0 → Used in tiny whoops (BT2.0 is better for power delivery)

    Connector Tips:

    ✅ Always match connectors on your drone and battery.
    ✅ Use high-quality, gold-plated connectors for better conductivity.
    ✅ Keep connectors clean and tight to avoid voltage drops.
    ✅ If soldering connectors, use proper gauge wire (12AWG for 6S).
    ✅ Avoid adapters unless necessary (they add resistance and voltage sag).


    2. LiPo Chargers & Charging Tips

    Types of LiPo Chargers:

    1. Basic Chargers (Single Port, Plug & Play)
      • Example: iMAX B6
      • Good for beginners but slow & limited
    2. Smart Chargers (Multi-Port, Balance, Fast Charging)
      • Example: ISDT, HOTA D6 Pro, ToolkitRC M6
      • Supports multiple LiPos, balance charging, and adjustable current
    3. Parallel Chargers (Charge Multiple Batteries at Once)
      • Use a parallel charging board to charge multiple same-voltage batteries
      • Ensure all batteries are at a similar voltage before plugging in

    Recommended Charger Features:

    Balance Charging (ensures even voltage across all cells)
    Adjustable Current & Voltage (for different battery sizes)
    Storage Mode (automatically discharges to 3.8V per cell)
    High Power Output (for faster charging; 100W+ recommended)

    Charging Safety Tips:

    ⚠️ NEVER charge damaged or puffy batteries!
    ⚠️ Always charge in a LiPo-safe bag or fireproof container.
    ⚠️ Never overcharge (4.2V per cell max).
    ⚠️ Don’t leave batteries charging unattended.
    ⚠️ Use correct charge current (1C = safest, 2C max for fast charging).


    3. Parallel Charging – Fast Charging Multiple Batteries

    Parallel charging is great for FPV pilots who need to charge multiple packs quickly.

    How It Works:

    • All batteries must be same cell count (e.g., all 6S, all 4S)
    • All batteries should be at a similar voltage before plugging in
    • Use a high-quality parallel board with fuses

    Parallel Charging Formula:

    • Example: If charging four 6S 1300mAh batteries in parallel, set charger to 5.2A (1.3A × 4) for 1C charging.
    • For 2C charging, double the current (10.4A).

    Final Takeaways

    🔋 XT60 is the standard for 6S FPV drones.
    ⚡ Use a smart charger for flexibility & better safety.
    🔥 Charge in a safe place, always monitor, and store correctly.
    🚀 Parallel charging saves time but must be done carefully.